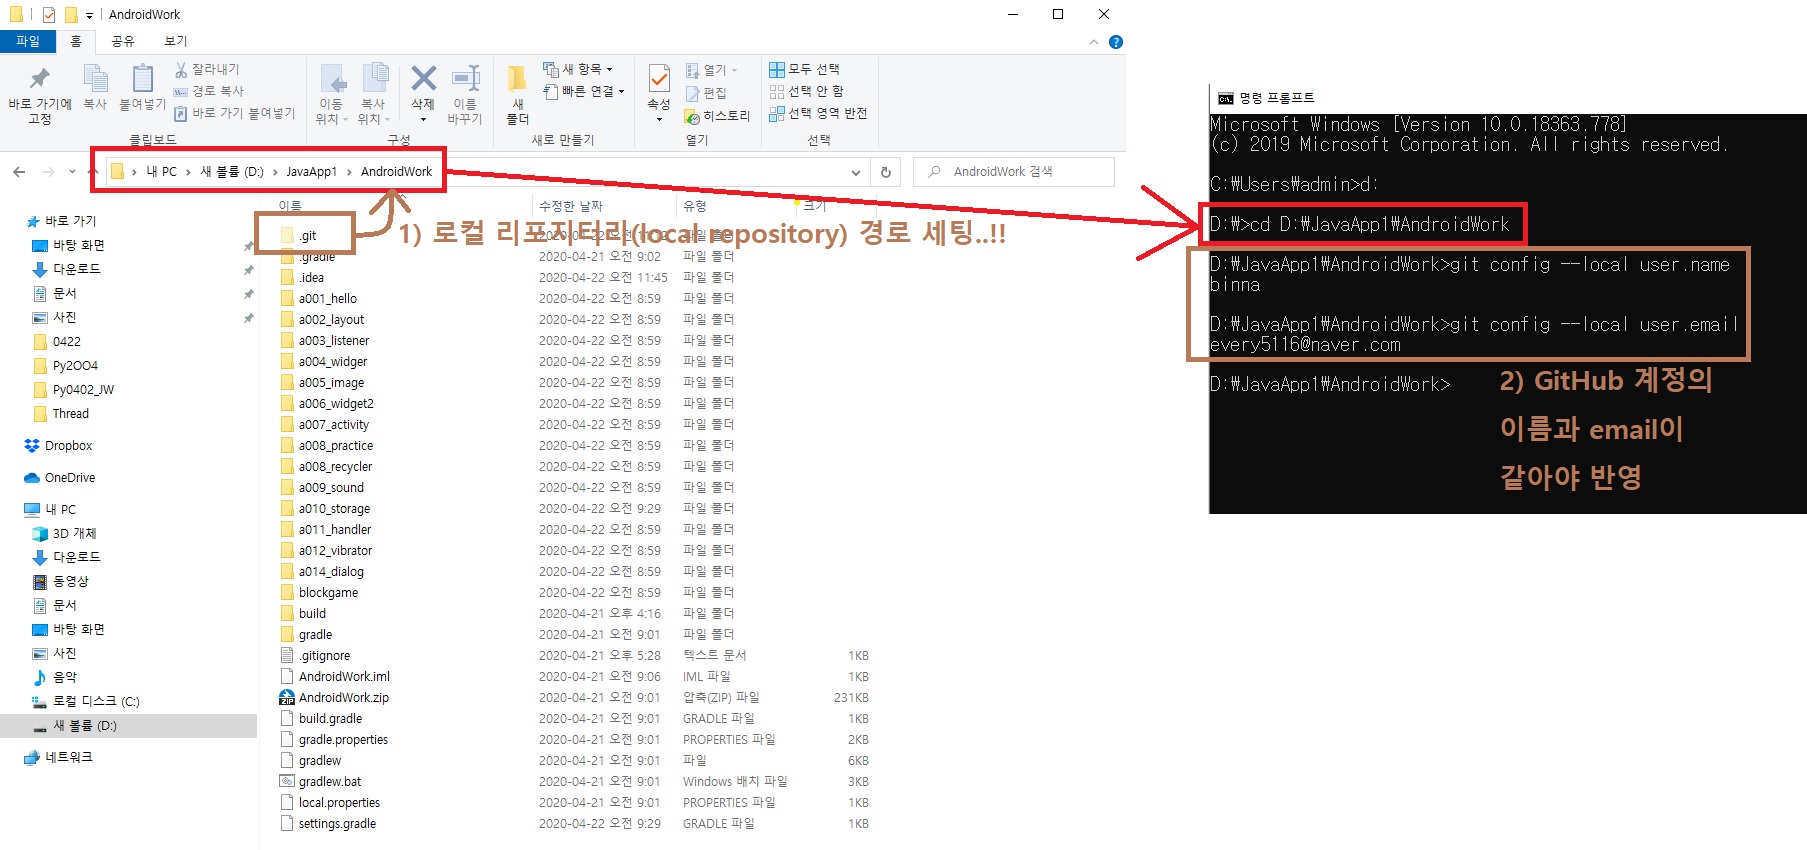
1. GitHub에서 Contribution에 반영하는 법
: 로컬 리포지터리(local repository) 경로에서 user.name과 user.email 세팅 필요
(GitHub 계정의 이름과 email이 같아야 반영)
1) 확인하기
** 이름 : git config --local user.name
** 이메일 : git config --local user.email
2) 세팅하기
** 커맨드 창에서 로컬 리포지터리(local repository) 경로 이동
** git config --local user.name "github에 가입시 등록한 자신의 이름"
** git config --local user.email "github에 가입시 등록한 이메일"
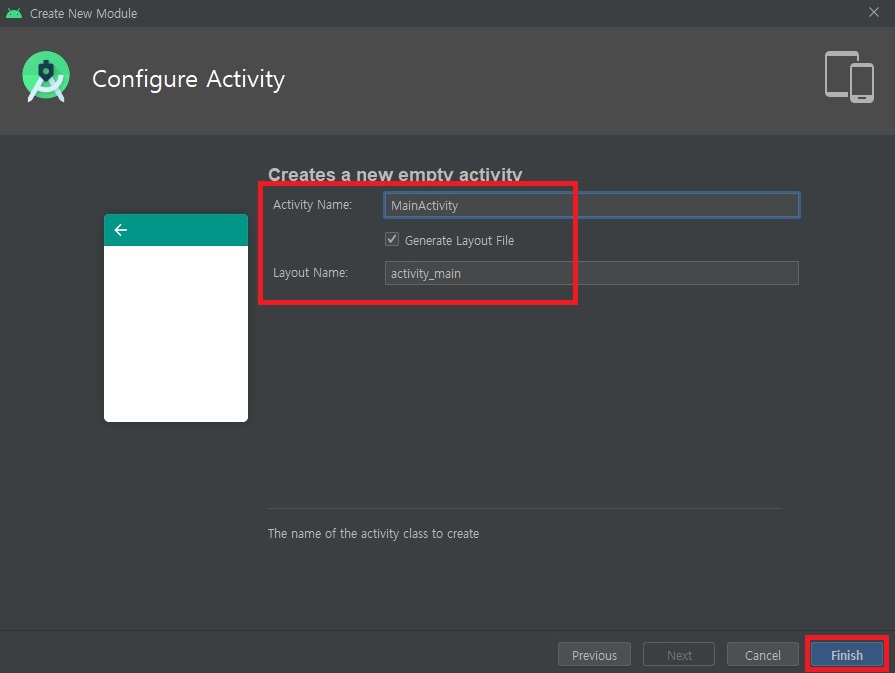
2. a010_storage 모듈
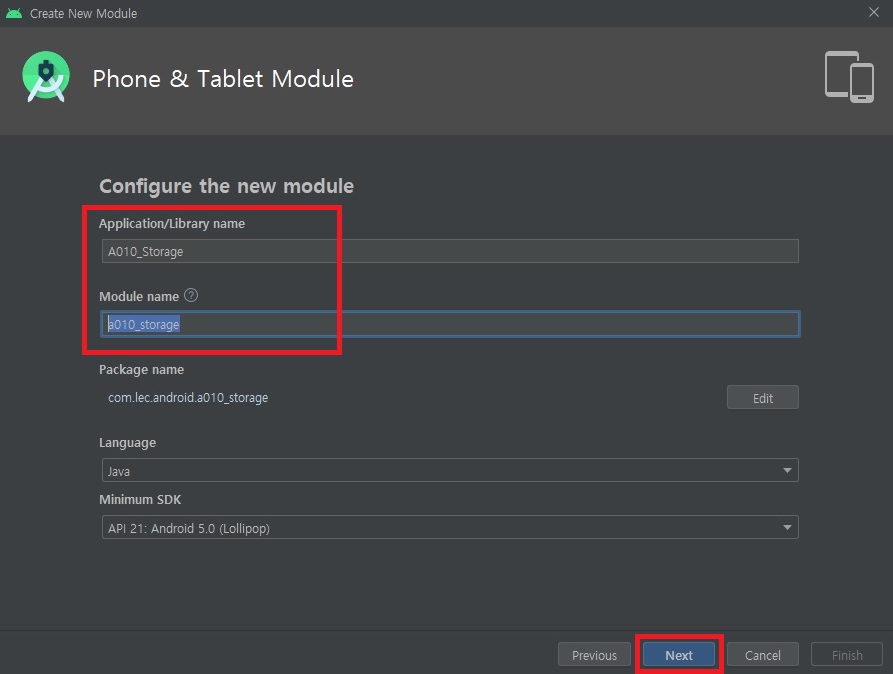
1) MainActivity 액티비티, activity_main 레이아웃
<?xml version="1.0" encoding="utf-8"?>
<manifest xmlns:android="http://schemas.android.com/apk/res/android"
    package="com.lec.android.a010_storage">

    <application
        android:allowBackup="true"
        android:icon="@mipmap/ic_launcher"
        android:label="@string/app_name"
        android:roundIcon="@mipmap/ic_launcher_round"
        android:supportsRtl="true"
        android:theme="@style/AppTheme">
        <activity android:name=".MainActivity">
            <intent-filter>
                <action android:name="android.intent.action.MAIN" />

                <category android:name="android.intent.category.LAUNCHER" />
            </intent-filter>
        </activity>
    </application>

</manifest>
<?xml version="1.0" encoding="utf-8"?>
<LinearLayout xmlns:android="http://schemas.android.com/apk/res/android"
xmlns:app="http://schemas.android.com/apk/res-auto"
xmlns:tools="http://schemas.android.com/tools"
android:layout_width="match_parent"
android:layout_height="match_parent"
android:orientation="vertical"
tools:context=".MainActivity" >
<TextView
android:id="@+id/tvTitle"
android:layout_width="match_parent"
android:layout_height="wrap_content"
android:text="Internal Storage"
android:textAppearance="@style/TextAppearance.AppCompat.Display1" />
<EditText
android:id="@+id/et"
android:layout_width="match_parent"
android:layout_height="wrap_content"
android:ems="10"
android:inputType="textPersonName"
android:text="안녕하세요" />
<Button
android:id="@+id/btnAppend"
android:layout_width="match_parent"
android:layout_height="wrap_content"
android:text="추가저장" />
<Button
android:id="@+id/btnRead"
android:layout_width="match_parent"
android:layout_height="wrap_content"
android:text="읽어오기" />
<TextView
android:id="@+id/tvResult"
android:layout_width="match_parent"
android:layout_height="match_parent"
android:text="결과창" />
</LinearLayout>package com.lec.android.a010_storage;
import androidx.appcompat.app.AppCompatActivity;
import android.os.Bundle;
import android.view.View;
import android.widget.Button;
import android.widget.EditText;
import android.widget.TextView;
import java.io.BufferedReader;
import java.io.FileInputStream;
import java.io.FileOutputStream;
import java.io.IOException;
import java.io.InputStreamReader;
import java.io.PrintWriter;
/**
* 안드로이드 에서 자료를 저장하는 4가지 수단
* 1. 내부파일 사용 (Internal Storage) : '앱 데이터' 저장 영역
* 2. 외부메모리 사용 (External Storage) : 사진, 동영상등 '사용자 영역'
* 3. SQLite (내장 DataBase)
* 4. SharedPreference
*
* ** 외부에 (서버, 네트워크, 외부 DB) 사용이 아닌 내부 저장수단
*
* https://developer.android.com/training/data-storage
*
* 내부 파일 사용 (Internal Storage, App-specific storage)
* - 앱 데이터가 저장되는 영역
* - 별도의 permission 없이 사용 가능
* - 자신의 앱에서만 사용 가능, 다른 앱에서 접근 못함
* - 앱 제거시, Internal Storage 영역의 모든 데이터도 제거됨.
* - openFileOutput() 를 사용하여 저장 ( FileOutputStream 객체 리턴함 )
*/
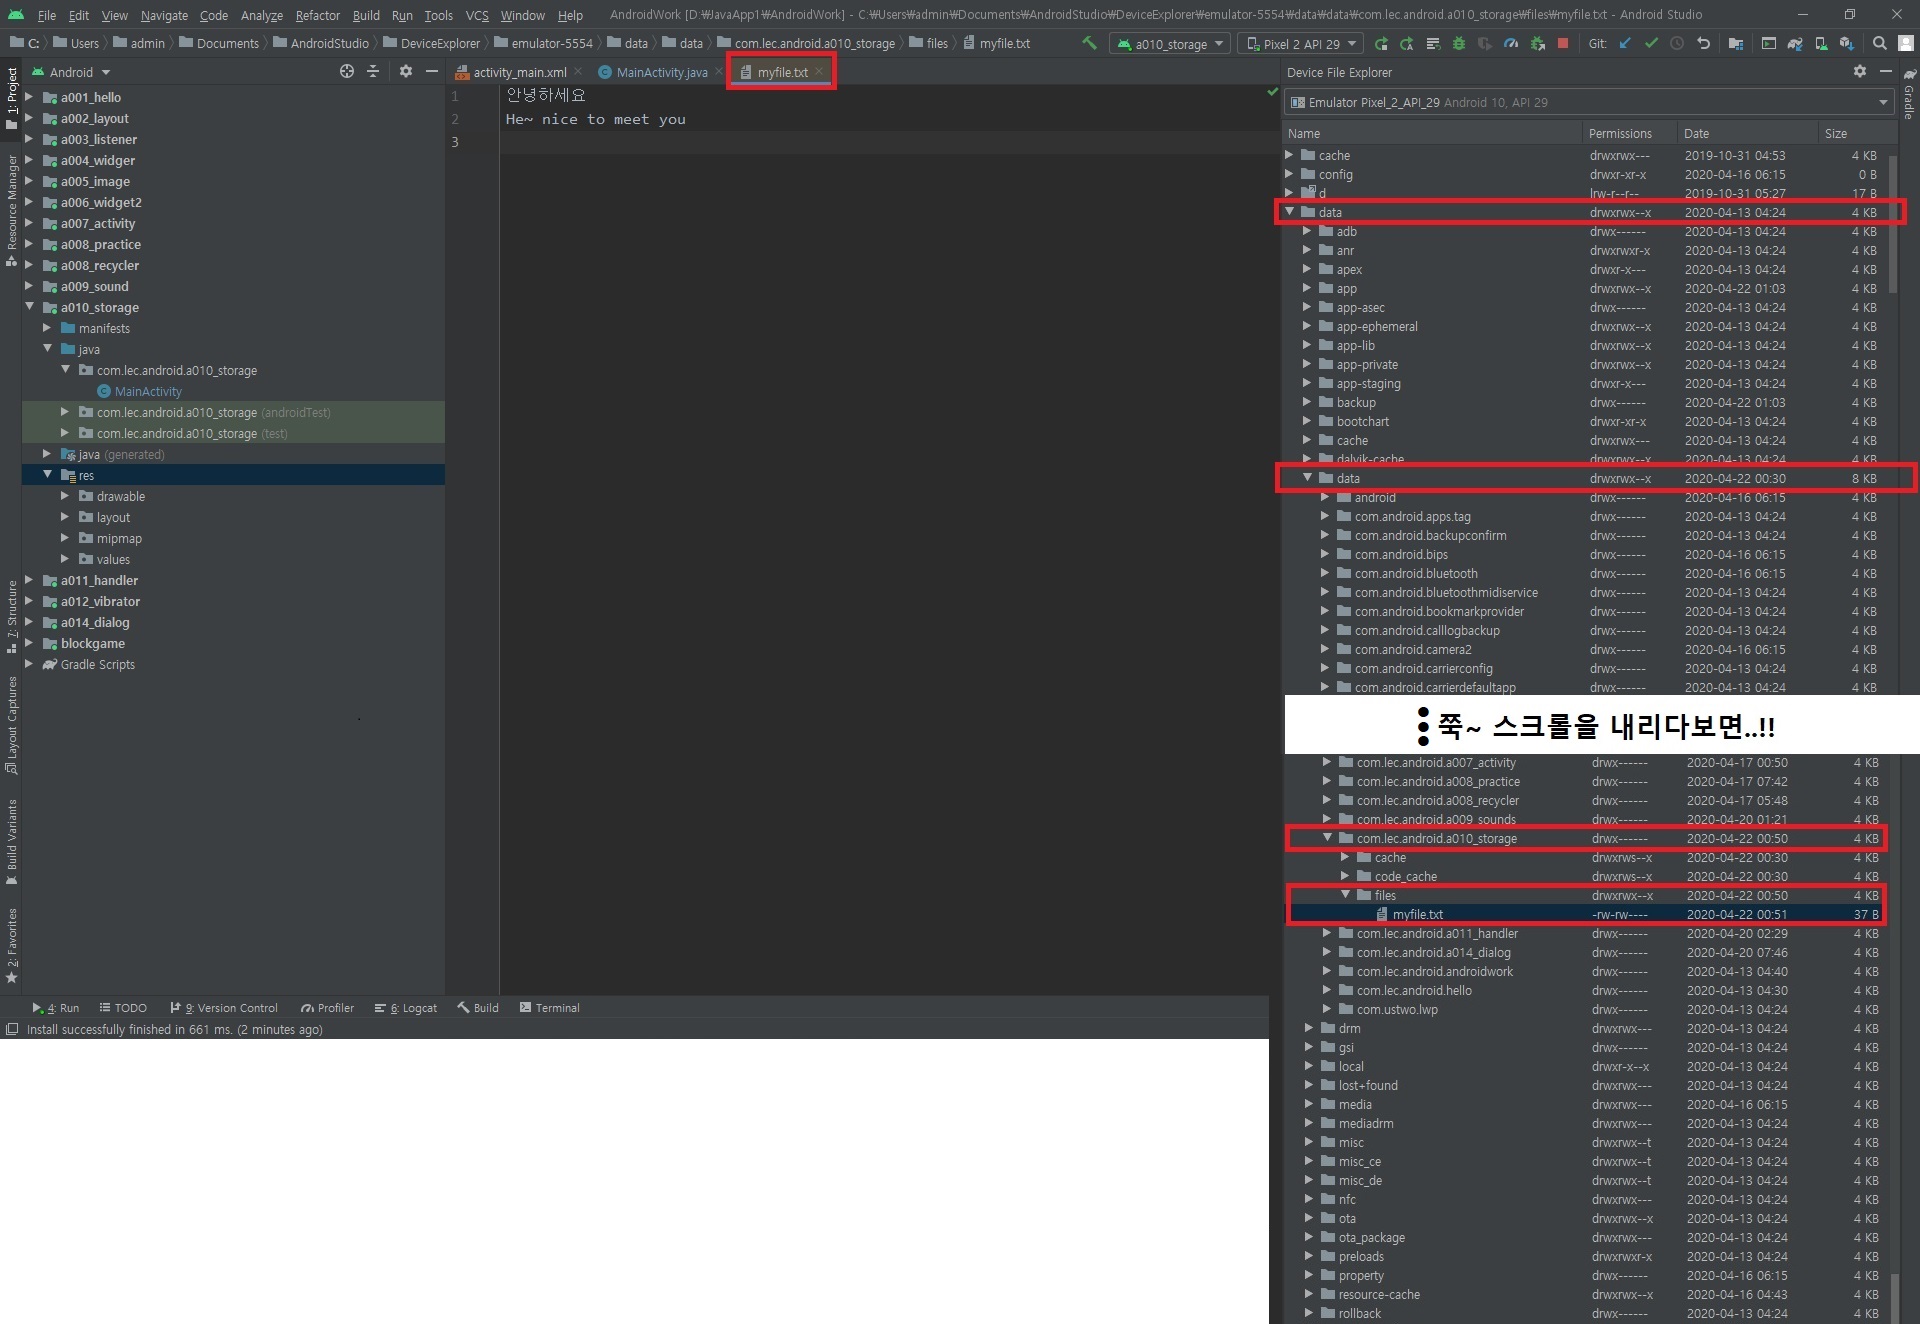
// Device File Explrer 에서 생성된 파일 확인 가능
// Pixel2 폰의 경우
// /data/data/com.lec.android.a010_storage/files/myfile.txt
public class MainActivity extends AppCompatActivity {
EditText et;
Button btnAppend, btnRead;
TextView tvResult;
@Override
protected void onCreate(Bundle savedInstanceState) {
super.onCreate(savedInstanceState);
setContentView(R.layout.activity_main);
et = findViewById(R.id.et);
btnAppend = findViewById(R.id.btnAppend);
btnRead = findViewById(R.id.btnRead);
tvResult = findViewById(R.id.tvResult);
// R(write), A(append), R(read)
// 추가하기 버튼 클릭하면 파일에 추가로 저장하기
btnAppend.setOnClickListener(new View.OnClickListener() {
@Override
public void onClick(View v) {
String data = et.getText().toString();
try {
// openFileOutput 을 사용하여 OutputStream 객체 뽑아내기
FileOutputStream os = openFileOutput("myfile.txt", MODE_APPEND);
PrintWriter out = new PrintWriter(os);
out.println(data);
out.close();
tvResult.setText("파일 저장 완료");
} catch (IOException e) {
e.printStackTrace();
}
}
});
// 파일의 내용을 읽어서 보여주기
btnRead.setOnClickListener(new View.OnClickListener() {
@Override
public void onClick(View v) {
try {
FileInputStream is = openFileInput("myfile.txt");
BufferedReader reader = new BufferedReader(new InputStreamReader(is));
StringBuffer data = new StringBuffer();
String str = reader.readLine(); // 파일에서 한줄을 읽어 오기
while (str != null) {
data.append(str + "\n");
str = reader.readLine();
} // end while
tvResult.setText(data);
reader.close();
} catch (IOException e) {
e.printStackTrace();
}
}
});
} // end onCreate()
} // end Activity
[추가] data/data/com.lec.android.a010_storage/files/myfile.txt에서 생성된 파일을 확인할 수 있음
2) Main2Activity 액티비티, activity_main2 레이아웃

<?xml version="1.0" encoding="utf-8"?>
<manifest xmlns:android="http://schemas.android.com/apk/res/android"
    package="com.lec.android.a010_storage">

    <!-- 외부 저장소 사용 권한 -->
    <uses-permission android:name="android.permission.WRITE_EXTERNAL_STORAGE" />
    <uses-permission android:name="android.permission.READ_EXTERNAL_STORAGE" />

    <application
        android:allowBackup="true"
        android:icon="@mipmap/ic_launcher"
        android:label="@string/app_name"
        android:roundIcon="@mipmap/ic_launcher_round"
        android:supportsRtl="true"
        android:requestLegacyExternalStorage="true"
        android:theme="@style/AppTheme">
        <activity android:name=".Main2Activity">
            <intent-filter>
                <action android:name="android.intent.action.MAIN" />

                <category android:name="android.intent.category.LAUNCHER" />
            </intent-filter>
        </activity>

        <activity android:name=".MainActivity" />
    </application>

</manifest>
<?xml version="1.0" encoding="utf-8"?>
<LinearLayout xmlns:android="http://schemas.android.com/apk/res/android"
android:layout_width="fill_parent"
android:layout_height="fill_parent"
android:orientation="vertical" >
<TextView
android:id="@+id/tvTitle"
android:layout_width="match_parent"
android:layout_height="wrap_content"
android:text="External Storage"
android:textAppearance="@style/TextAppearance.AppCompat.Display1" />
<EditText
android:id="@+id/etInput"
android:layout_width="match_parent"
android:layout_height="wrap_content"
android:ems="10"
android:text="안녕하세요" >
<requestFocus />
</EditText>
<Button
android:id="@+id/btnSave"
android:layout_width="wrap_content"
android:layout_height="wrap_content"
android:text="저장하기" />
<Button
android:id="@+id/btnRead"
android:layout_width="wrap_content"
android:layout_height="wrap_content"
android:text="읽어오기" />
<TextView
android:id="@+id/tvResult"
android:layout_width="match_parent"
android:layout_height="match_parent"
android:text="결과창"
android:textAppearance="?android:attr/textAppearanceLarge" />
</LinearLayout>package com.lec.android.a010_storage;
import androidx.annotation.NonNull;
import androidx.appcompat.app.AppCompatActivity;
import android.Manifest;
import android.content.pm.PackageManager;
import android.os.Build;
import android.os.Bundle;
import android.os.Environment;
import android.util.Log;
import android.view.View;
import android.widget.Button;
import android.widget.EditText;
import android.widget.TextView;
import android.widget.Toast;
import java.io.BufferedReader;
import java.io.File;
import java.io.FileReader;
import java.io.FileWriter;
import java.io.IOException;
import java.io.PrintWriter;
/**
* 외부 메모리 (External Memory 혹은 Shared storage)
* 사용자 영역 에 저장 ( sdcard 같은 외장 메모리를 의미하는게 아니다)
* 메모리가 장착(mount)되어 있어야 사용 가능
* 모든 앱에서 접근 가능 (공유 가능)
*
* 외부 메모리에 파일 읽기/쓰기
* 1. 외부 메모리 장치가 있는지 확인해야한다 : getExternalStorageState()
* 2-1 AndroidManifest.xml 외부메모리 저장권한을 선언해야 함 (API 23 이전 버젼)
* WRITE_EXTERNAL_STORAGE, READ_EXTERNAL_STORAGE
* 2-2 API 23+ (마시멜로): 새로운 권한 획득 방법 사용.
* Run-time 에 onRequestPermissionsResult() 사용 해야 한다!!!
* https://developer.android.com/training/permissions/requesting.html
*
* 3. 읽기/쓰기 경로를 지정한다
*/
public class Main2Activity extends AppCompatActivity {
EditText etInput;
Button btnSave, btnRead;
TextView tvResult;
// permission 관련
final String[] PERMISSIONS = {Manifest.permission.WRITE_EXTERNAL_STORAGE};
final int REQUEST_CODE = 100;
@Override
protected void onCreate(Bundle savedInstanceState) {
super.onCreate(savedInstanceState);
setContentView(R.layout.activity_main2);
etInput = findViewById(R.id.etInput);
btnRead = findViewById(R.id.btnRead);
btnSave = findViewById(R.id.btnSave);
tvResult = findViewById(R.id.tvResult);
// 위험권한 획득
if(Build.VERSION.SDK_INT >= Build.VERSION_CODES.M &&
checkSelfPermission(String.valueOf(PERMISSIONS)) == PackageManager.PERMISSION_DENIED) {
requestPermissions(PERMISSIONS, REQUEST_CODE); // 권한 요청하기
}
btnSave.setOnClickListener(new View.OnClickListener() {
@Override
public void onClick(View v) {
if (!checkExternalStorage()) {return;} // 외부 메모리 사용 못하면 종료
String data = etInput.getText().toString();
try {
// 저장 경로 가져오기
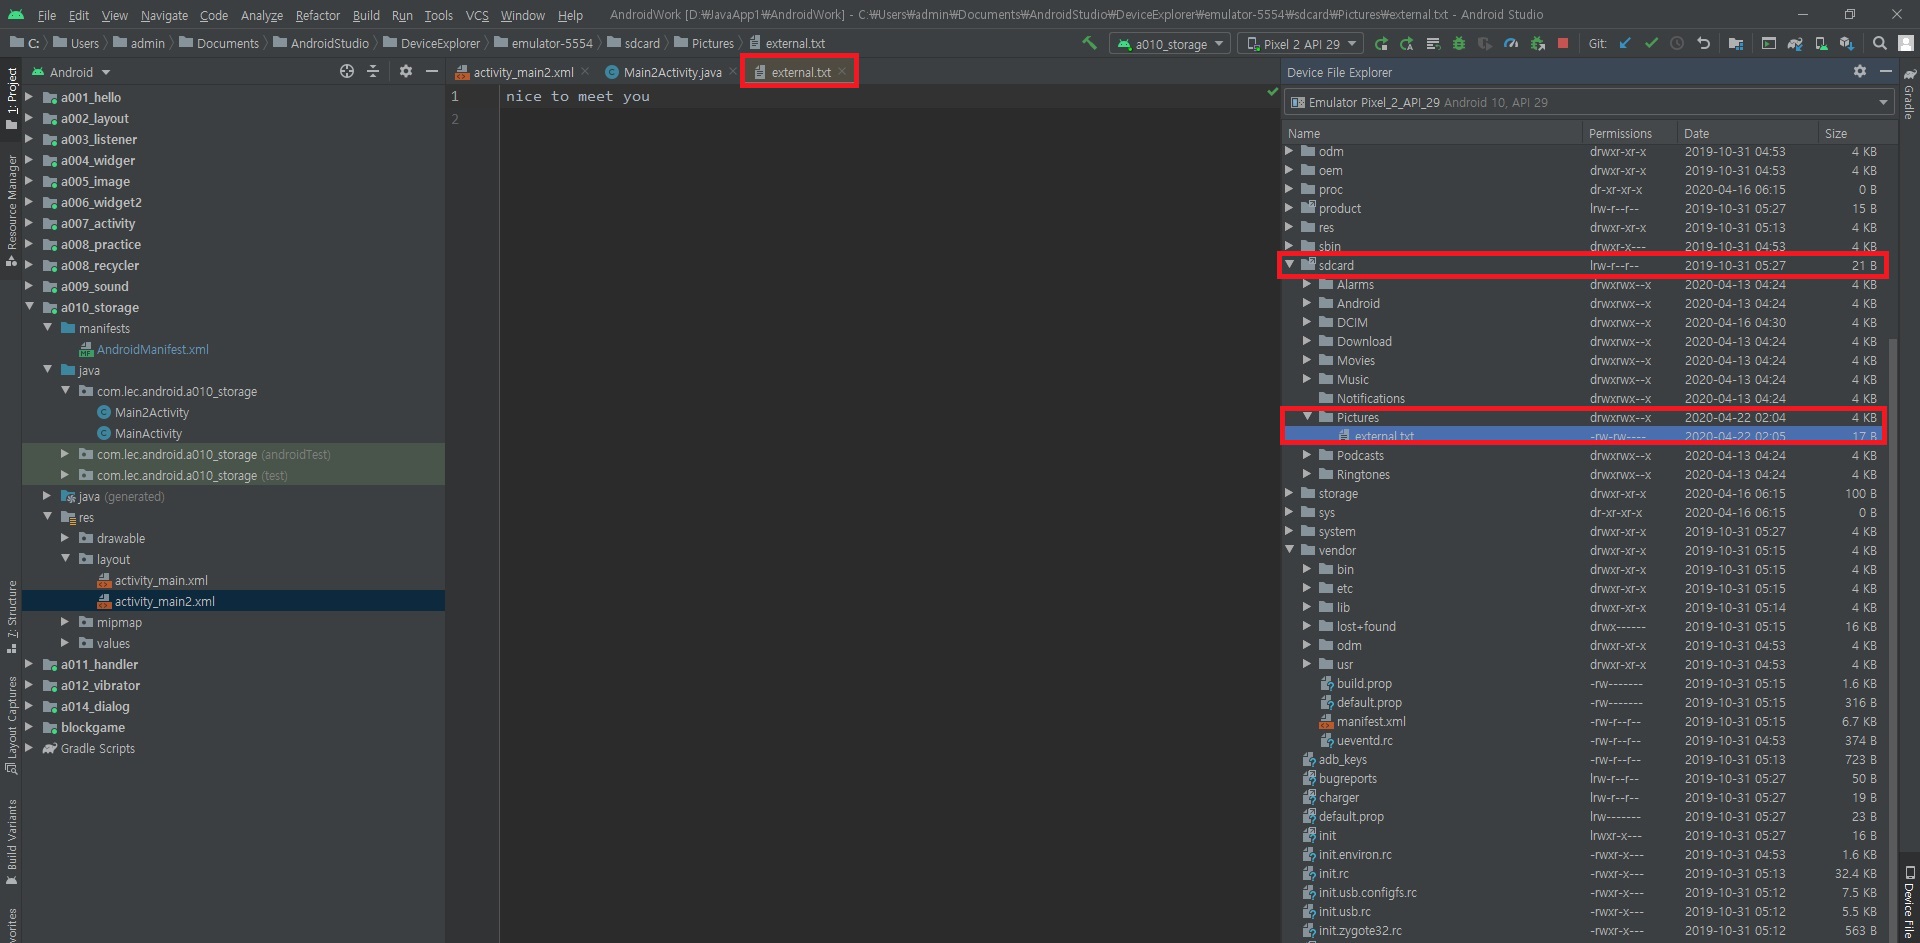
File path = Environment.getExternalStoragePublicDirectory(Environment.DIRECTORY_PICTURES);
File f = new File(path, "external.txt"); // 경로/파일명
FileWriter writer = new FileWriter(f, false); // true 이면 append 모드로 생성
PrintWriter out = new PrintWriter(writer);
out.println(data);
out.close();
tvResult.setText("저장완료");
} catch (IOException e) {
e.printStackTrace();
}
}
});
btnRead.setOnClickListener(new View.OnClickListener() {
@Override
public void onClick(View v) {
if (!checkExternalStorage()) {return;} // 외부메모리 사용 가능 여부 체크
try {
File path = Environment.getExternalStoragePublicDirectory(Environment.DIRECTORY_PICTURES);
File f = new File(path, "external.txt");
BufferedReader reader = new BufferedReader(new FileReader(f));
StringBuffer data = new StringBuffer();
String str = reader.readLine();
while (str != null) {
data.append(str);
str = reader.readLine();
}
tvResult.setText(data);
reader.close();
} catch (IOException e) {
e.printStackTrace();
}
}
});
} // end onCreate()
// 권한 획득 결과 받으면 실행되는 콜백
@Override
public void onRequestPermissionsResult(int requestCode, @NonNull String[] permissions, @NonNull int[] grantResults) {
switch (requestCode) {
case REQUEST_CODE:
if (grantResults.length > 0 && grantResults[0] == PackageManager.PERMISSION_GRANTED) {
Toast.makeText(this, "권한 승인", Toast.LENGTH_LONG).show();
} else {
Toast.makeText(this, "권한 거부", Toast.LENGTH_LONG).show();
// 권한이 없으면 더이상 진행 못하게 하든지 다른 조치를 취해야 한다.
// onDestroy();
}
return;
} // end switch
} // end onRequestPermissionsResult()
// 외부 메모리 상태 확인 메소드
protected boolean checkExternalStorage() {
String state = Environment.getExternalStorageState();
String msg = "";
// 외부 메모리 상태
if (Environment.MEDIA_MOUNTED.equals(state)) { // "mounted"
// 읽기, 쓰기 모두 가능
msg = "외부메모리 읽기 쓰기 모두 가능";
Log.d("mpapp", msg);
Toast.makeText(this,msg, Toast.LENGTH_LONG).show();
return true;
} else if(Environment.MEDIA_MOUNTED_READ_ONLY.equals(state)) { // "mounted_ro"
// 읽기 전용
msg = "외부메모리 읽기만 가능";
msg = " 외부메모리 읽기만 가능";
Log.d("mpapp", msg);
Toast.makeText(this,msg, Toast.LENGTH_LONG).show();
return false;
} else {
// 읽기 쓰기 모두 안됨..!!
msg = "외부메모리 읽기쓰기 모두 안됨 : " + state;
Log.d("myapp", msg);
Toast.makeText(this, msg, Toast.LENGTH_LONG).show();
return false;
}
} // end checkExternalStorage()
} // end Activity
[추가] sdcard/Pictures/external.txt에서 생성된 파일을 확인할 수 있음
3) Main3Activity 액티비티, activity_main3 레이아웃

<?xml version="1.0" encoding="utf-8"?>
<manifest xmlns:android="http://schemas.android.com/apk/res/android"
    package="com.lec.android.a010_storage">
    <!-- 외부 저장소 사용 권한 -->
    <uses-permission android:name="android.permission.WRITE_EXTERNAL_STORAGE" />
    <uses-permission android:name="android.permission.READ_EXTERNAL_STORAGE" />

    <application
        android:allowBackup="true"
        android:icon="@mipmap/ic_launcher"
        android:label="@string/app_name"
        android:requestLegacyExternalStorage="true"
        android:roundIcon="@mipmap/ic_launcher_round"
        android:supportsRtl="true"
        android:theme="@style/AppTheme">
        <activity android:name=".Main3Activity">
            <intent-filter>
                <action android:name="android.intent.action.MAIN" />

                <category android:name="android.intent.category.LAUNCHER" />
            </intent-filter>
        </activity>

        <activity android:name=".Main2Activity" />
        <activity android:name=".MainActivity" />
    </application>

</manifest>
<?xml version="1.0" encoding="utf-8"?>
<androidx.constraintlayout.widget.ConstraintLayout xmlns:android="http://schemas.android.com/apk/res/android"
xmlns:app="http://schemas.android.com/apk/res-auto"
xmlns:tools="http://schemas.android.com/tools"
android:layout_width="match_parent"
android:layout_height="match_parent"
tools:context=".Main3Activity">
<TextView
android:id="@+id/textView"
android:layout_width="146dp"
android:layout_height="88dp"
android:text="SQLite"
android:textAppearance="@style/TextAppearance.AppCompat.Display1"
app:layout_constraintBottom_toBottomOf="parent"
app:layout_constraintEnd_toEndOf="parent"
app:layout_constraintStart_toStartOf="parent"
app:layout_constraintTop_toTopOf="parent" />
</androidx.constraintlayout.widget.ConstraintLayout>
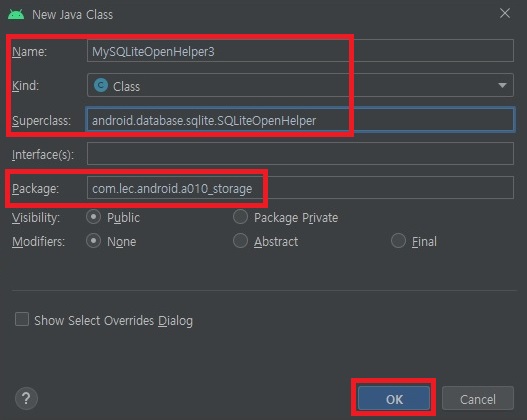
** MySQLiteOpenHelper3 클래스
package com.lec.android.a010_storage;

import android.content.Context;
import android.database.sqlite.SQLiteDatabase;
import android.database.sqlite.SQLiteOpenHelper;
import android.util.Log;

import androidx.annotation.Nullable;
// SQLiteOpenHelper
// 안드로이드에서 SQLite3 데이터베이스를 좀 더 쉽게 사용할 수 있도록 제공되는 클래스
public class MySQLiteOpenHelper3 extends SQLiteOpenHelper {

    public MySQLiteOpenHelper3(@Nullable Context context, @Nullable String name,
                               @Nullable SQLiteDatabase.CursorFactory factory, int version) {
        super(context, name, factory, version);
        Log.d("myapp", "SQLiteOpenHelper 생성");
    }

    // 앱 설치 후 최소에 데이터베이스가 '없는 경우', 데이터 베이스 생성을 위해 호출되는 콜백
    // 최소의 가동될 때만 실행됨...!! 딱 한 번만...!!
    // 주로 DDL 등 테이블 생성하는 코드 작성
    @Override
    public void onCreate(SQLiteDatabase db) {
        Log.d("myapp", "SQLiteOpenHelper] onCreate() 호출");

        String sql = "CREATE TABLE myTable (" +
                "id INTEGER PRIMARY KEY AUTOINCREMENT, " +
                "name TEXT" +
                ")";

        db.execSQL(sql);
    }

    // 데이터베이스의 '버전'이 바뀌었을때 호출되는 콜백
    // '버전'이 바뀌었을때 기존의 설치 운영되고 있는 데이터베이스를 어떻게 변경할 것인지 작성
    // '버전'이 바뀔 때마다 실행됨...!!
    // 각 버전의 변경 내용들을 버전마다 작성해야 함
    @Override
    public void onUpgrade(SQLiteDatabase db, int oldVersion, int newVersion) {
        Log.d("myapp", "SQLiteOpenHelper] onUpgrade 호출" + oldVersion + " -> " + newVersion);

        String sql = "DROP TABLE myTable";  // 기존 테이블 삭제
        db.execSQL(sql);
        onCreate(db);   // 다시 테이블 생성
    }
}
** Main3Activity 액티비티
package com.lec.android.a010_storage;

import androidx.appcompat.app.AppCompatActivity;

import android.database.Cursor;
import android.database.SQLException;
import android.database.sqlite.SQLiteDatabase;
import android.os.Bundle;
import android.util.Log;

// SQLite3 : 안드로이드에 기본탑재된 모바일 용으로 제작된 경량화 DB
//          C언어로 엔진이 제작되어 가볍다
//          안드로이드에서 sqLite3 를 쉽게 사용할 수 있도록 SQLiteOpenHelper클래스제공

// SQLite 를 사용한 데이터 저장
//   1. SQLiteOpenHelper 를 상속받은 클래스 정의
//      onCreate(), onUpgrade() 작성
//   2. 위 Helper 로부터 SQLiteDatabase  DB 객체 추출
//   3. DML 명령은 : execSQL()
//      SELECT 명령은 : rawQuery() --> 결과는 Cursor 객체 사용하여 다룸

public class Main3Activity extends AppCompatActivity {

    MySQLiteOpenHelper3 helper;
    String dbName = "st_file.db";   // '파일'의 형태로 DB가 저장된다.
    int dbVersion = 2;  // 데이터베이스 버전
    SQLiteDatabase db;

    @Override
    protected void onCreate(Bundle savedInstanceState) {
        super.onCreate(savedInstanceState);
        setContentView(R.layout.activity_main3);

        helper = new MySQLiteOpenHelper3(
                this,   // 현재 화면의 제어권자
                dbName, // DB 이름
                null,   // 커서팩토리-null : 표준 커서가 사용됨
                dbVersion   // DB버전
                );

        try {
            db = helper.getWritableDatabase();  // 읽고 쓰기 가능한 DB
            //db = helper.getReadableDatabase();  // 읽기 전용 DB ( 예. SELECT 만 사용하는 경우 )
        } catch (SQLException e) {
            e.printStackTrace();
            Log.e("myapp", "데이터베이스를 얻어올 수 없음");
            finish();   // 액티비티 종료
        }

        insert();

        select();

        update();

        select();

        delete();

        select();

    } // end onCreate()

    void delete() {
        db.execSQL("DELETE FROM myTable WHERE id = 2");
        Log.d("myapp", "DELETE 완료");
    }

    void update() {
        db.execSQL("UPDATE myTable SET name = '홍성용' WHERE id = 5");
        Log.d("myapp", "UPDATE 완료");
    }

    void select() {
        Cursor c = db.rawQuery("SELECT * FROM myTable", null);
        while(c.moveToNext()) {
            int id = c.getInt(0);   // 컬럼 인덱스 0부터 시작!!!
            String name = c.getString(1);
            Log.d("myapp", "id : " + id + ", name : " + name);
        }
    } // end select()

    void insert() {
        db.execSQL("INSERT INTO myTable (name) values ('김민호')");
        db.execSQL("INSERT INTO myTable (name) values ('이승환')");
        db.execSQL("INSERT INTO myTable (name) values ('남윤주')");
        db.execSQL("INSERT INTO myTable (name) values ('이성은')");
        db.execSQL("INSERT INTO myTable (name) values ('윤종섭')");
        Log.d("myapp", "INSERT 성공~");
    } // end insert()

} // end Activity
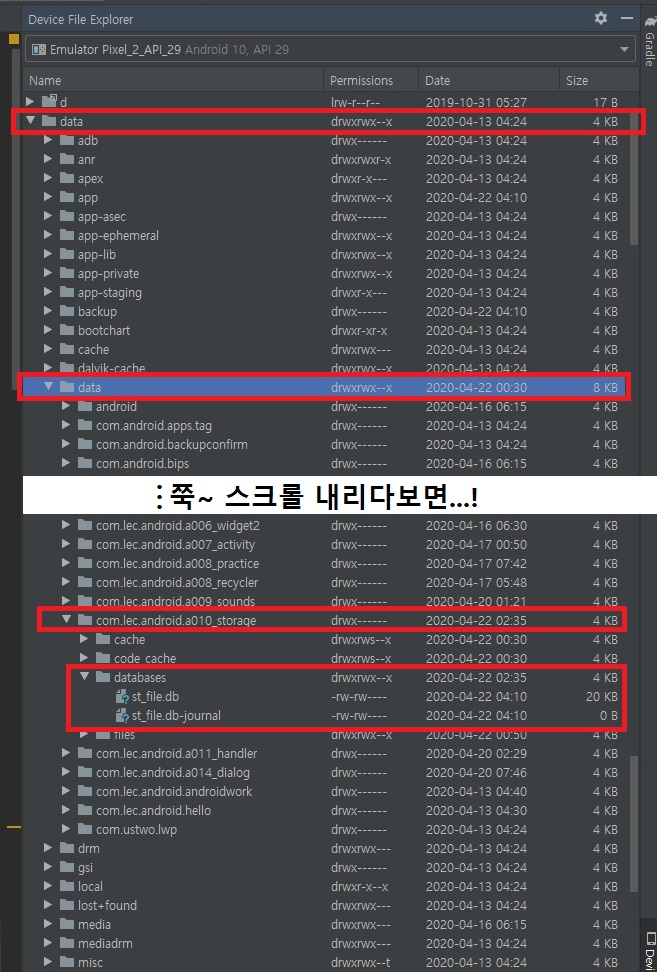
[추가] data/data/com.lec.android.a010_storage/databases에서 생성된 파일을 확인할 수 있음
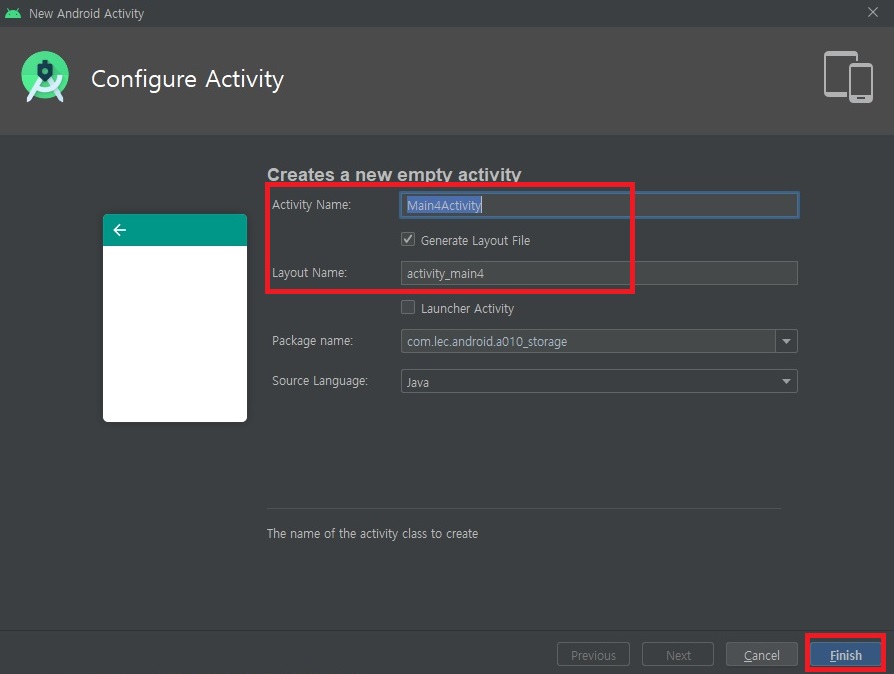
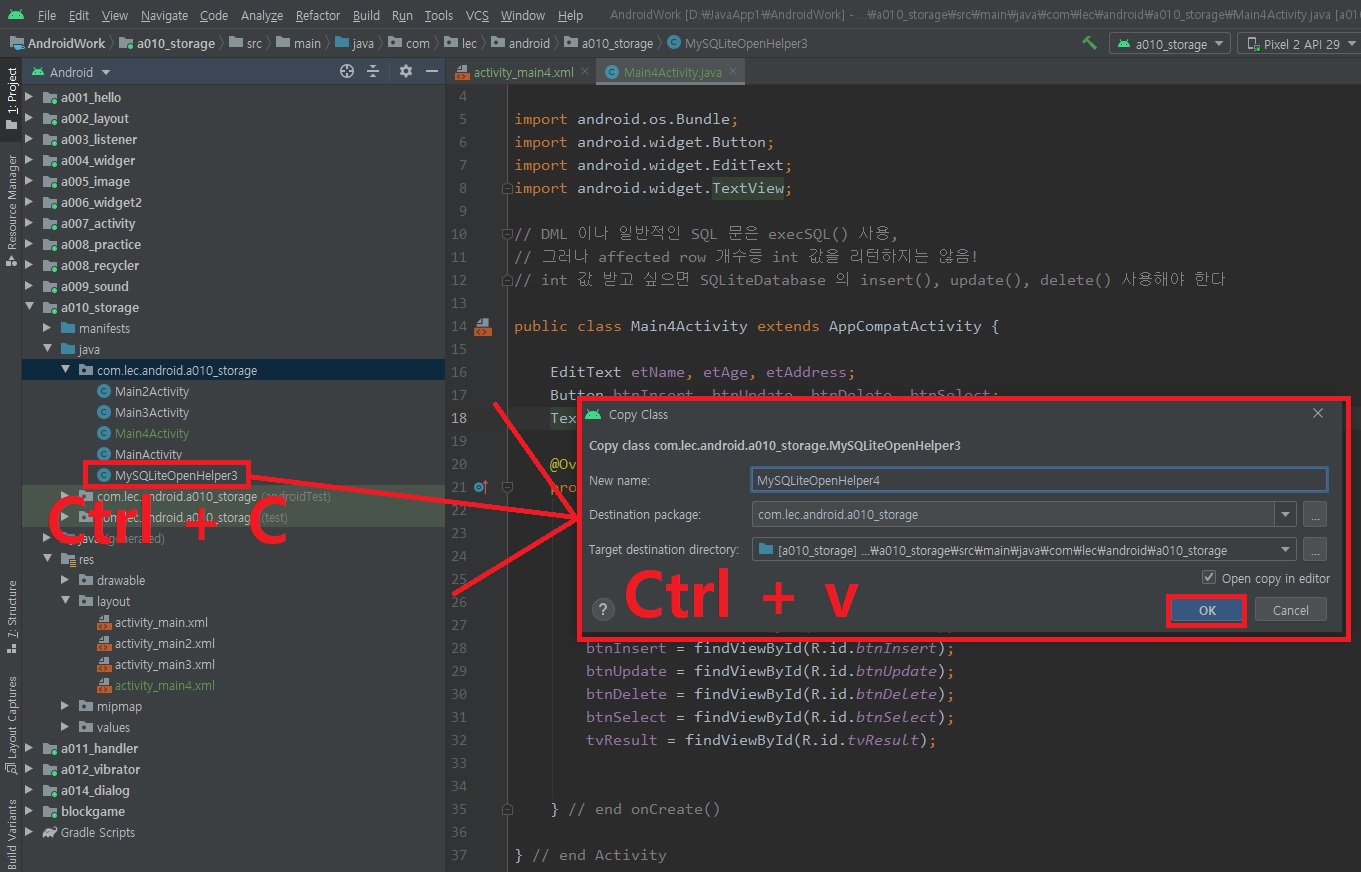
4) Main4Activity 액티비티, activity_main4 레이아웃
[추가] 기존의 MySQLiteOpenHelper3 클래스를 복사하여 MySQLiteOpenHelper4로 클래스 파일 만들기
<?xml version="1.0" encoding="utf-8"?>
<manifest xmlns:android="http://schemas.android.com/apk/res/android"
    package="com.lec.android.a010_storage">
    <!-- 외부 저장소 사용 권한 -->
    <uses-permission android:name="android.permission.WRITE_EXTERNAL_STORAGE" />
    <uses-permission android:name="android.permission.READ_EXTERNAL_STORAGE" />

    <application
        android:allowBackup="true"
        android:icon="@mipmap/ic_launcher"
        android:label="@string/app_name"
        android:requestLegacyExternalStorage="true"
        android:roundIcon="@mipmap/ic_launcher_round"
        android:supportsRtl="true"
        android:theme="@style/AppTheme">
        <activity android:name=".Main4Activity">
            <intent-filter>
                <action android:name="android.intent.action.MAIN" />

                <category android:name="android.intent.category.LAUNCHER" />
            </intent-filter>
        </activity>

        <activity android:name=".Main3Activity" />
        <activity android:name=".Main2Activity" />
        <activity android:name=".MainActivity" />
    </application>

</manifest>
<?xml version="1.0" encoding="utf-8"?>
<LinearLayout xmlns:android="http://schemas.android.com/apk/res/android"
xmlns:app="http://schemas.android.com/apk/res-auto"
xmlns:tools="http://schemas.android.com/tools"
android:layout_width="match_parent"
android:layout_height="match_parent"
android:orientation="vertical"
tools:context=".Main4Activity">
<TextView
android:id="@+id/tvTitle"
android:layout_width="match_parent"
android:layout_height="wrap_content"
android:text="SQLite 예제"
android:textAppearance="@style/TextAppearance.AppCompat.Display1" />
<TableLayout
android:layout_width="match_parent"
android:layout_height="wrap_content">
<TableRow
android:layout_width="match_parent"
android:layout_height="match_parent">
<TextView
android:id="@+id/tvName"
android:layout_width="wrap_content"
android:layout_height="wrap_content"
android:text="이름"
android:textAppearance="@style/TextAppearance.AppCompat.Large" />
<EditText
android:id="@+id/etName"
android:layout_width="match_parent"
android:layout_height="wrap_content"
android:ems="10"
android:inputType="textPersonName" />
</TableRow>
<TableRow
android:layout_width="match_parent"
android:layout_height="match_parent">
<TextView
android:id="@+id/tvAge"
android:layout_width="wrap_content"
android:layout_height="wrap_content"
android:text="나이"
android:textAppearance="@style/TextAppearance.AppCompat.Large" />
<EditText
android:id="@+id/etAge"
android:layout_width="wrap_content"
android:layout_height="wrap_content"
android:ems="10"
android:inputType="number" />
</TableRow>
<TableRow
android:layout_width="match_parent"
android:layout_height="match_parent">
<TextView
android:id="@+id/tvAddress"
android:layout_width="wrap_content"
android:layout_height="wrap_content"
android:text="주소"
android:textAppearance="@style/TextAppearance.AppCompat.Large" />
<EditText
android:id="@+id/etAddress"
android:layout_width="wrap_content"
android:layout_height="wrap_content"
android:ems="10"
android:inputType="textPersonName" />
</TableRow>
</TableLayout>
<LinearLayout
android:layout_width="match_parent"
android:layout_height="wrap_content"
android:orientation="horizontal">
<Button
android:id="@+id/btnInsert"
android:layout_width="wrap_content"
android:layout_height="wrap_content"
android:layout_weight="1"
android:text="INSERT" />
<Button
android:id="@+id/btnUpdate"
android:layout_width="wrap_content"
android:layout_height="wrap_content"
android:layout_weight="1"
android:text="UPDATE" />
<Button
android:id="@+id/btnDelete"
android:layout_width="wrap_content"
android:layout_height="wrap_content"
android:layout_weight="1"
android:text="DELETE" />
<Button
android:id="@+id/btnSelect"
android:layout_width="wrap_content"
android:layout_height="wrap_content"
android:layout_weight="1"
android:text="SELECt" />
</LinearLayout>
<TextView
android:id="@+id/tvResult"
android:layout_width="match_parent"
android:layout_height="match_parent"
android:text="결과창"
android:textAppearance="@style/TextAppearance.AppCompat.Medium" />
</LinearLayout>
** Main4Activity 액티비티
package com.lec.android.a010_storage;

import androidx.appcompat.app.AppCompatActivity;

import android.content.ContentValues;
import android.database.Cursor;
import android.database.sqlite.SQLiteDatabase;
import android.database.sqlite.SQLiteException;
import android.os.Bundle;
import android.util.Log;
import android.view.View;
import android.view.inputmethod.InputMethodManager;
import android.widget.Button;
import android.widget.EditText;
import android.widget.TextView;

// DML 이나 일반적인 SQL 문은 execSQL() 사용,
// 그러나 affected row 개수등 int 값을 리턴하지는 않음!
// int 값 받고 싶으면 SQLiteDatabase 의 insert(), update(), delete() 사용해야 한다

// 기존의 JDBC 프로그래밍과 다른 독특한 메소드들 제공

public class Main4Activity extends AppCompatActivity {

    String dbName = "st_file2.db";
    int dvVersion = 1;
    MySQLiteOpenHelper4 helper;
    SQLiteDatabase db;
    String tableName = "student";

    EditText etName, etAge, etAddress;
    Button btnInsert, btnUpdate, btnDelete, btnSelect;
    TextView tvResult;   // 결과창

    @Override
    protected void onCreate(Bundle savedInstanceState) {
        super.onCreate(savedInstanceState);
        setContentView(R.layout.activity_main4);

        etName = findViewById(R.id.etName);
        etAge = findViewById(R.id.etAge);
        etAddress = findViewById(R.id.etAddress);
        btnInsert = findViewById(R.id.btnInsert);
        btnUpdate = findViewById(R.id.btnUpdate);
        btnDelete = findViewById(R.id.btnDelete);
        btnSelect = findViewById(R.id.btnSelect);
        tvResult = findViewById(R.id.tvResult);

        helper = new MySQLiteOpenHelper4(
                this,
                dbName,
                null,
                dvVersion
        );

        try {
            db = helper.getWritableDatabase();
        } catch (SQLiteException e) {
            e.printStackTrace();
            Log.e("myapp", "데이터베이스를 열 수 없음");   // Logcat 의 error 에 표시함
        }

        btnInsert.setOnClickListener(new View.OnClickListener() {
            @Override
            public void onClick(View v) {
                String name = etName.getText().toString();
                String age = etAge.getText().toString();
                String address = etAddress.getText().toString();

                if("".equals(name)) {
                    tvResult.setText("INSERT 실패 : 필수 항목을 입력하세요");
                    return;
                }

                int a = 0;
                try {
                    a = Integer.parseInt(age);
                } catch (NumberFormatException e) {
                    tvResult.setText("INSERT 실패 - age 는 숫자로 입력하세요");
                }

                insert(name, a, address);

            }
        });

        btnUpdate.setOnClickListener(new View.OnClickListener() {
            @Override
            public void onClick(View v) {
                String name = etName.getText().toString();
                String age = etAge.getText().toString();
                String address = etAddress.getText().toString();

                if("".equals(name)) {
                    tvResult.setText("UPDATE 실패 : 필수 항목을 입력하세요");
                    return;
                }

                int a = 0;
                try {
                    a = Integer.parseInt(age);
                } catch (NumberFormatException e) {
                    tvResult.setText("UPDATE 실패 - age 는 숫자로 입력하세요");
                }

                update(name, a, address);

            }
        });

        btnDelete.setOnClickListener(new View.OnClickListener() {
            @Override
            public void onClick(View v) {
                String name = etName.getText().toString();

                if("".equals(name)) {
                    tvResult.setText("DELETE 실패 - 삭제된 이름을 입력하세요");
                    return;
                }

                delete(name);

            }
        });

        btnSelect.setOnClickListener(new View.OnClickListener() {
            @Override
            public void onClick(View v) {
                tvResult.setText("");
                select();
            }
        });

    } // end onCreate()

    void insert(String name, int age, String address) {

        ContentValues values = new ContentValues(); // name-value 쌍으로 저장하는 객체

        // 키, 값의 쌍으로 데이터 입력
        values.put("name", name);
        values.put("age", age);
        values.put("address", address);

        // INSERT INTO tableName(name, age, address) values(?, ?, ?)
        // 리턴값은 auto-generated key 값, 실패하면 -1 리턴
        long result = db.insert(tableName, null, values);

        Log.d("myapp", result + "번째 row INSERT 성공");
        tvResult.setText(result + "번째 row INSERT 성공");
        select();
    } // end insert()

    void select() {
        // SELECT 문을 위한 query() 메소드
        Cursor c = db.query(tableName, null, null,
                null, null, null, null);

        // db.query("sku_table", columns, "owner=?", new String[] { "Mike" }, null, null, null);
        //                           --> WHERE owner='Mike'
        //  db.query("sku_table", columns, "owner=? AND price=?", new String[] { "Mike", "100" }, null, null, null);
        //                          --> WHERE owner='Mike' AND price=100

        while (c.moveToNext()) {
            int id = c.getInt(0);
            String name = c.getString(1);
            int age = c. getInt(2);
            String address = c.getString(3);

            String msg = String.format("id:%d, name:%s, age:%d, address:%s", id, name, age, address);

            Log.d("myapp", msg);
            tvResult.append("\n" + msg);
        } // end while

        // 키보드 내리기
        InputMethodManager imm = (InputMethodManager)getSystemService(INPUT_METHOD_SERVICE);
        imm.hideSoftInputFromWindow(getCurrentFocus().getWindowToken(), 0);

    } // end select()

    void update(String name, int age, String address) {
        ContentValues values = new ContentValues();

        values.put("age", age); // 변경할 값
        values.put("address", address); // 변경할 값

        // UPDATE student SET age = ?, address = ? WHERE name = ?
        // 리턴값은 affected rows
        int cnt = db.update(tableName,    // 테이블명
                values, // 변경할 값들
                "name=?",   // WHERE 조건절
                new String[] {name} // 조건절의 ? 값들
                );

        String msg = cnt + " 개의 row update 성공";
        tvResult.setText(msg);
        select();
    } // end update()

    // 특정 name 값을 가진 레코드(들) 삭제
    void delete (String name) {

        // 리턴값은 affected rows
        int cnt = db.delete(tableName,    // 테이블명
                "name=?",   // WHERE 조건절
                new String[] {name} // 위 조건절의 ? 값들
                );

        String msg = cnt + "개 row delete 성공";
        tvResult.setText(msg);
        Log.d("myapp", msg);
        select();
    } // end delete()

} // end Activity

/*
   insert() 의 두번째 매개변수 nullColumnHack 의 의미
       어떤 테이블의 모든 컬럼이 NULL 입력이 가능하다고 하자.
       이 경우 INSERT INTO suchTable; 과 같이 SQL 구문을 작성할 수 있지만 SQLite3 에서는 유효한 구문이 아니다.
       이 대신 INSERT INTO suchTable(column) VALUES(NULL); 처럼 하나라도 값을 채워주어야 SQL 문이 정상적으로 수행한다.
       이처럼 입력하는 레코드의 데이터가 빈 경우, 즉 ContentValues 객체에 put() 메서드로 입력된 값이 없는 경우에는 두 번째 인자인 nullColumnHack 에 문자열로 테이블의 한 컬럼을 지정해줘야 에러 없이 정상적으로 SQL 문이 수행된다.
*/
** MySQLiteOpenHelper4 클래스
package com.lec.android.a010_storage;

import android.content.Context;
import android.database.sqlite.SQLiteDatabase;
import android.database.sqlite.SQLiteOpenHelper;
import android.util.Log;

import androidx.annotation.Nullable;

// SQLiteOpenHelper
// 안드로이드에서 SQLite4 데이터베이스를 좀 더 쉽게 사용할 수 있도록 제공되는 클래스
public class MySQLiteOpenHelper4 extends SQLiteOpenHelper {

    public MySQLiteOpenHelper4(@Nullable Context context, @Nullable String name,
                               @Nullable SQLiteDatabase.CursorFactory factory, int version) {
        super(context, name, factory, version);
        Log.d("myapp", "SQLiteOpenHelper 생성");
    }

    // 앱 설치 후 최소에 데이터베이스가 '없는 경우', 데이터 베이스 생성을 위해 호출되는 콜백
    // 주로 DDL 등 테이블 생성하는 코드 작성
    @Override
    public void onCreate(SQLiteDatabase db) {
        Log.d("myapp", "SQLiteOpenHelper] onCreate() 호출");

        String sql = "CREATE TABLE student (" +
                "id INTEGER PRIMARY KEY AUTOINCREMENT, " +
                "name TEXT, age INTEGER, address TEXT" +
                ")";

        db.execSQL(sql);
    }

    // 데이터베이스의 '버전'이 바뀌었을때 호출되는 콜백
    // '버전'이 바뀌었을때 기존의 설치 운영되고 있는 데이터베이스를 어떻게 변경할 것인지 작성
    // 각 버전의 변경 내용들을 버전마다 작성해야 함
    @Override
    public void onUpgrade(SQLiteDatabase db, int oldVersion, int newVersion) {
        Log.d("myapp", "SQLiteOpenHelper] onUpgrade 호출" + oldVersion + " -> " + newVersion);

        String sql = "DROP TABLE IF EXISTS student";  // 기존 테이블 삭제
        db.execSQL(sql);
        onCreate(db);   // 다시 테이블 생성
    }
}
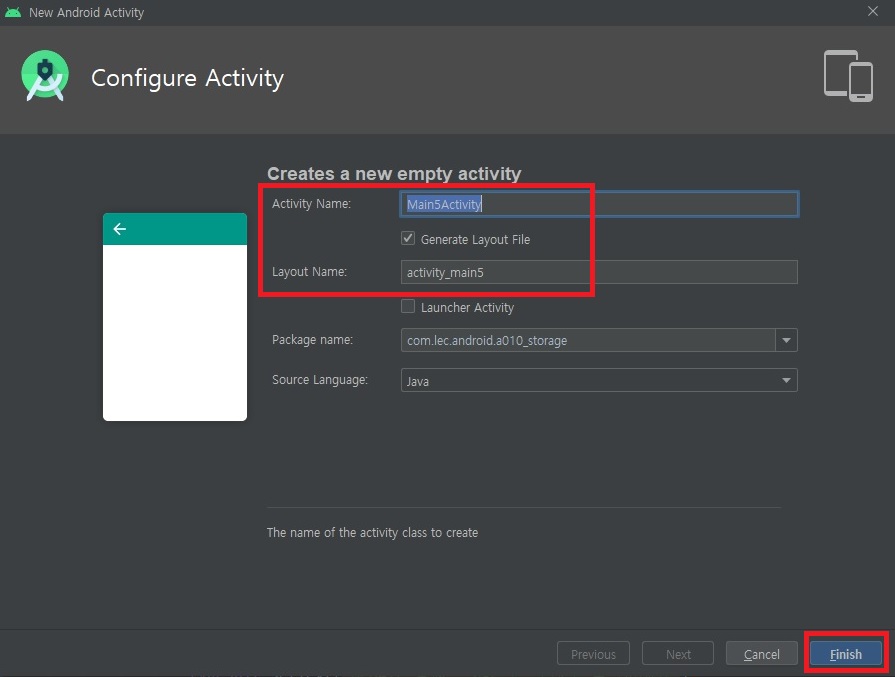
5) Main5Activity 액티비티, activity_main5 레이아웃
<?xml version="1.0" encoding="utf-8"?>
<manifest xmlns:android="http://schemas.android.com/apk/res/android"
    package="com.lec.android.a010_storage">
    <!-- 외부 저장소 사용 권한 -->
    <uses-permission android:name="android.permission.WRITE_EXTERNAL_STORAGE" />
    <uses-permission android:name="android.permission.READ_EXTERNAL_STORAGE" />

    <application
        android:allowBackup="true"
        android:icon="@mipmap/ic_launcher"
        android:label="@string/app_name"
        android:requestLegacyExternalStorage="true"
        android:roundIcon="@mipmap/ic_launcher_round"
        android:supportsRtl="true"
        android:theme="@style/AppTheme">
        <activity android:name=".Main5Activity">
            <intent-filter>
                <action android:name="android.intent.action.MAIN" />

                <category android:name="android.intent.category.LAUNCHER" />
            </intent-filter>
        </activity>

        <activity android:name=".Main4Activity" />
        <activity android:name=".Main3Activity" />
        <activity android:name=".Main2Activity" />
        <activity android:name=".MainActivity" />
    </application>

</manifest>
<?xml version="1.0" encoding="utf-8"?>
<LinearLayout xmlns:android="http://schemas.android.com/apk/res/android"
xmlns:app="http://schemas.android.com/apk/res-auto"
xmlns:tools="http://schemas.android.com/tools"
android:layout_width="match_parent"
android:layout_height="match_parent"
android:orientation="vertical"
tools:context=".Main5Activity">
<TextView
android:id="@+id/tvTitle"
android:layout_width="match_parent"
android:layout_height="wrap_content"
android:text="SharedPreference"
android:textAppearance="@style/TextAppearance.AppCompat.Display1" />
<EditText
android:id="@+id/etInput"
android:layout_width="match_parent"
android:layout_height="83dp"
android:ems="10"
android:inputType="textPersonName"
android:text="Name" />
</LinearLayout>package com.lec.android.a010_storage;
import androidx.appcompat.app.AppCompatActivity;
import android.content.SharedPreferences;
import android.os.Bundle;
import android.util.Log;
import android.widget.EditText;
// SharedPreference
// key-value 쌍으로 데이터 저장
// 작은 데이터들 (세팅값들) 저장 용도로 활용
public class Main5Activity extends AppCompatActivity {
EditText etInput;
String sfName = "myFile";
@Override
protected void onCreate(Bundle savedInstanceState) {
super.onCreate(savedInstanceState);
setContentView(R.layout.activity_main5);
etInput = findViewById(R.id.etInput);
// 저장되어 있는 값을 꺼내서 보여주기
SharedPreferences sf = getSharedPreferences(sfName, MODE_PRIVATE);
String str = sf.getString("name", ""); // 키값으로 꺼냄
String xx = sf.getString("xx", "ABC");
String yy = sf.getString("yy", "XY2");
etInput.setText(str);
Log.d("myapp", str + " - " + xx + " - " + yy);
} // end onCreate()
@Override
protected void onPause() {
super.onPause();
// Activity 가 종료되기 전에 저장
SharedPreferences sf = getSharedPreferences(sfName, MODE_PRIVATE);
SharedPreferences.Editor editor = sf.edit(); // 저장하려면 Editor 객체 필요
String str = etInput.getText().toString(); // 사용자가 입력한 값
editor.putString("name", str);
editor.putString("xx", "가나다");
editor.commit(); // 파일에 최종 반영함.
} // end onPause()
} // end Activity
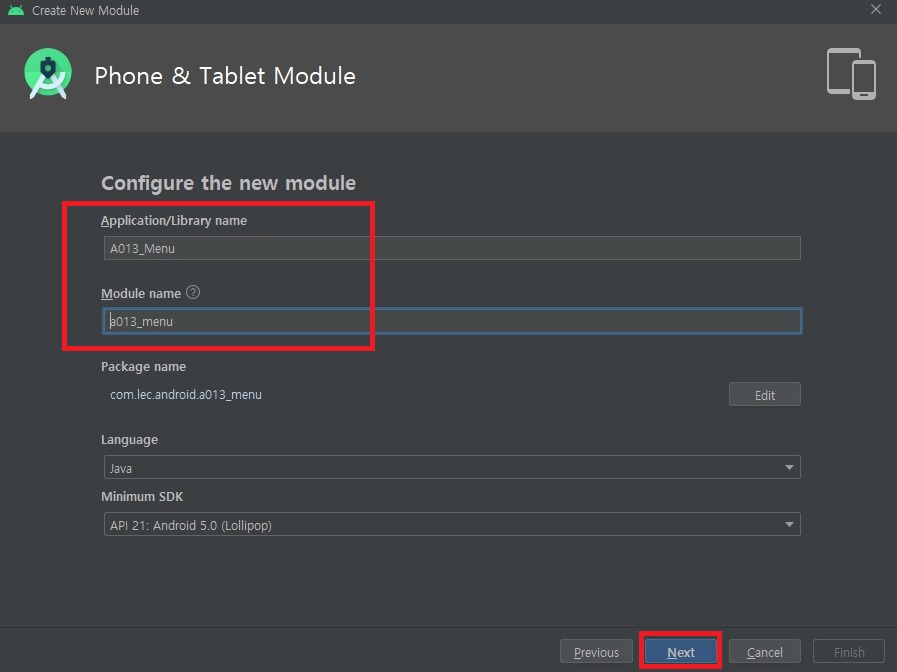
3. a013_Menu 모듈
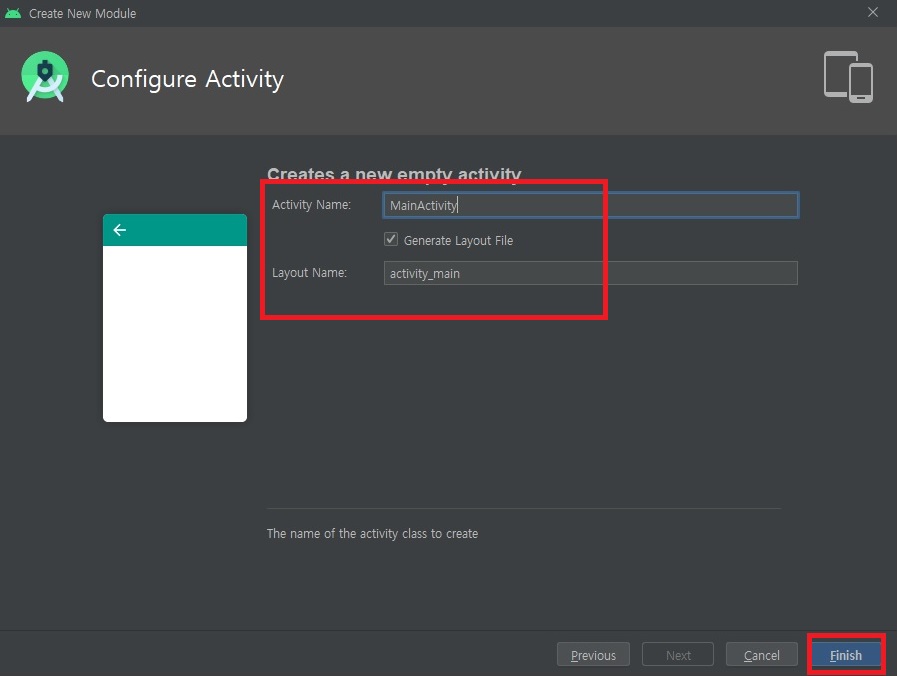
1) MainActivity 액티비티, activity_main 레이아웃
<?xml version="1.0" encoding="utf-8"?>
<manifest xmlns:android="http://schemas.android.com/apk/res/android"
    package="com.lec.android.a013_menu">

    <application
        android:allowBackup="true"
        android:icon="@mipmap/ic_launcher"
        android:label="@string/app_name"
        android:roundIcon="@mipmap/ic_launcher_round"
        android:supportsRtl="true"
        android:theme="@style/AppTheme">
        <activity android:name=".MainActivity">
            <intent-filter>
                <action android:name="android.intent.action.MAIN" />

                <category android:name="android.intent.category.LAUNCHER" />
            </intent-filter>
        </activity>
    </application>

</manifest>
<?xml version="1.0" encoding="utf-8"?>
<LinearLayout xmlns:android="http://schemas.android.com/apk/res/android"
xmlns:app="http://schemas.android.com/apk/res-auto"
xmlns:tools="http://schemas.android.com/tools"
android:id="@+id/ll"
android:layout_width="match_parent"
android:layout_height="match_parent"
android:orientation="vertical"
tools:context=".MainActivity">
<TextView
android:id="@+id/tvTitle"
android:layout_width="match_parent"
android:layout_height="wrap_content"
android:text="OptionMenu"
android:textAppearance="@style/TextAppearance.AppCompat.Display1" />
<ImageView
android:id="@+id/imageView3"
android:layout_width="match_parent"
android:layout_height="wrap_content"
app:srcCompat="@android:drawable/ic_input_add" />
</LinearLayout>
[추가] 옵션 레이아웃 만들기
① 먼저 폴더를 만들어야 함
: res > New > Android Resource Directory 선택
> Resource type을 menu로 선택 후 OK 클릭하면 폴더 생성

② 폴더 만든 후 메뉴 레이아웃 만들기
: 생성한 menu 폴더 선택 후 우클릭 > New > Menu Resource File 선택
> File name 설정 후 OK 클릭하면 레이아웃 생성
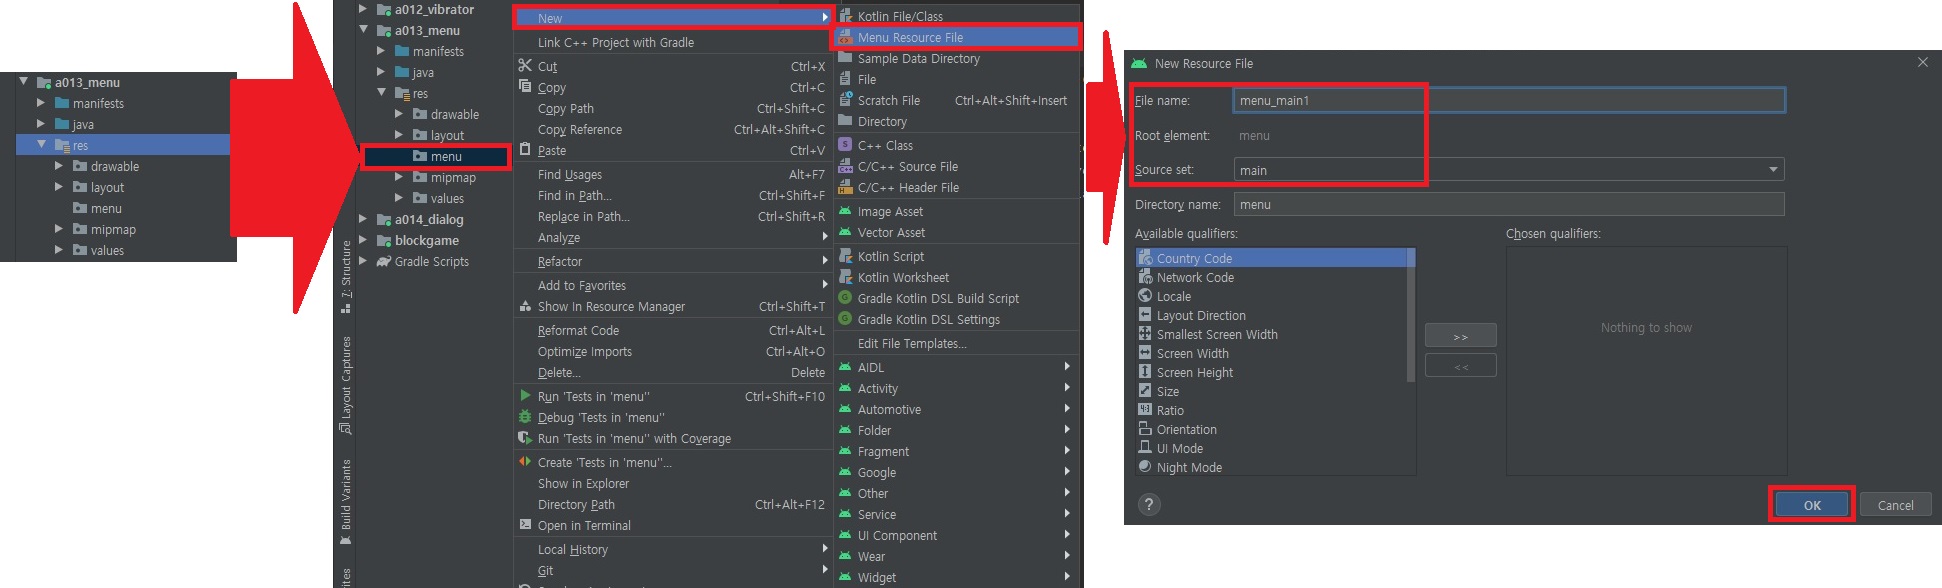
③ 메뉴 레이아웃 만들기..!!
<?xml version="1.0" encoding="utf-8"?>
<menu xmlns:android="http://schemas.android.com/apk/res/android"
    xmlns:app="http://schemas.android.com/apk/res-auto">

    <item
        android:id="@+id/menu_login"
        android:title="로그인"
        android:orderInCategory="100"
        app:showAsAction="never" />
    <item
        android:id="@+id/menu_logout"
        android:title="로그아웃"
        android:orderInCategory="100"
        app:showAsAction="never" />
    <item
        android:id="@+id/menu_next"
        android:title="다음"
        android:orderInCategory="100"
        app:showAsAction="never" />

    <!-- #3
        showAsAction :
        이 메뉴를 '액션바' 영역에 보이게 할지 여부
        always : 항상 보이게
        never : 항상 안보이게 하기
        ifRoom : 액션바에 여유공간이 있을때만 표시
        withTextView : title 속성으로 설정된 제목 같이 표시
        collapseActionView : 아이템에 설정한 뷰의 아이콘만 표시
    -->

    <item
        android:id="@+id/menu_pref"
        android:title="이전"
        android:orderInCategory="100"
        app:showAsAction="always" />

    <!-- 아이콘 가능: 아이콘이 있으면
        title 대신 icon 이 우선적으로 보임 -->
    <item
        android:id="@+id/menu_first"
        android:title="처음"
        android:orderInCategory="100"
        app:showAsAction="always"
        android:icon="@android:drawable/ic_media_rew" />

    <item
        android:id="@+id/menu_last"
        android:title="마지막"
        android:orderInCategory="100"
        app:showAsAction="always"
        android:icon="@android:drawable/ic_media_ff" />

    <!-- 액션바 공간 비좁다 -->
    <item
        android:id="@+id/menu_1"
        android:orderInCategory="100"
        android:title="첫번째"
        app:showAsAction="always"/>
    <item
        android:id="@+id/menu_2"
        android:orderInCategory="100"
        android:title="두번째"
        app:showAsAction="always"/>
    <item
        android:id="@+id/menu_3"
        android:orderInCategory="100"
        android:title="세번째"
        app:showAsAction="always"/>

    <item
        android:id="@+id/menu_4"
        android:orderInCategory="100"
        android:title="네번째"
        app:showAsAction="ifRoom"/>
    <item
        android:id="@+id/menu_5"
        android:orderInCategory="100"
        android:title="다섯번째"
        app:showAsAction="ifRoom"/>

</menu>
** MainActivity 액티비티
package com.lec.android.a013_menu;
import androidx.annotation.NonNull;
import androidx.appcompat.app.AppCompatActivity;
import android.os.Bundle;
import android.util.Log;
import android.view.Menu;
import android.view.MenuItem;
import android.widget.LinearLayout;
import android.widget.Toast;
/* 안드로이드의 메뉴
1. Option Menu : '메뉴' 버튼을 눌렀을때 나타나는 메뉴
각각의 '화면' (액티비티) 마다 설정
2. Context Menu : 길게 눌렀을때 나타나는 메뉴
각각의 '뷰' 마다 설정 (화면도 가능)
*/
public class MainActivity extends AppCompatActivity {
boolean blog = false; // 로그인 상태
LinearLayout ll;
// #2
static final int MENUITEM_YELLOW = 1;
static final int MENUITEM_ORANGE = 2;
static final int MENUITEM_CYAN = 3;
@Override
protected void onCreate(Bundle savedInstanceState) {
super.onCreate(savedInstanceState);
setContentView(R.layout.activity_main);
ll = findViewById(R.id.ll);
} // end onCreate()
// onCreateOptionsMenu()
// '옵션메뉴'버튼이 '처음' 눌러졌을 때 실행되는 메소드
// 메뉴버튼을 눌렀을 때 보여줄 menu 에 대해서 정의
@Override
public boolean onCreateOptionsMenu(Menu menu) {
getMenuInflater().inflate(R.menu.menu_main1, menu); // menu 리소스(xml)로부터 Menu 생성
Log.d("myapp", "onCreateOptionsMenu - 최초 메뉴키를 눌렀을때 호출됨");
// #2. 심지어 MenuItem 을 동적으로 추가 가능하다!
// add(), MenuItem 리턴
MenuItem item1 = menu.add(1, MENUITEM_YELLOW, 100, "노랑");
MenuItem item2 = menu.add(1, MENUITEM_ORANGE, 100, "오렌지");
MenuItem item3 = menu.add(1, MENUITEM_CYAN, 100, "퍼렁");
return true; // false 리턴하면 메뉴는 보여지지 않는다
}
// onPrepareOptionsMenu()
// '옵션메뉴'가 화면에 보여질때마다 호출되는 메소드
@Override
public boolean onPrepareOptionsMenu(Menu menu) {
Log.d("myapp", "onPrepareOptionsMenu - 옵션메뉴가 화면에 보여질때 마다 호출됨");
// 메뉴가 보여질때마다 '로그인', '로그아웃'이 enable/disable 토글되어 보이기
if(blog) { // 로그인 상태
// getItem(index) index 번째 MenuItem 객체 리턴
menu.getItem(0).setEnabled(true);
menu.getItem(1).setEnabled(false);
} else { // 로그아웃 상태
menu.getItem(0).setEnabled(false);
menu.getItem(1).setEnabled(true);
}
blog = !blog; // 값을 바꿈
return super.onPrepareOptionsMenu(menu); // false 리턴하면 메뉴 보여지지 않음
}
// onOptionsItemSelected()
// '옵션메뉴의 아이템'이 선택(클릭) 되었을때 호출되는 메소드
@Override
public boolean onOptionsItemSelected(@NonNull MenuItem item) {
Log.d("myapp", "onOptionsItemSelected - 메뉴 항목을 클릭했을때 호출됨");
showInfo(item);
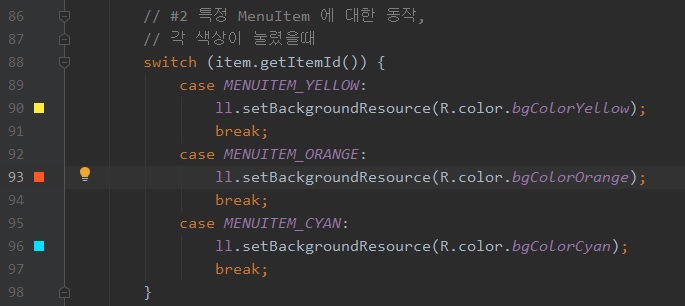
// #2 특정 MenuItem 에 대한 동작,
// 각 색상이 눌렸을때
switch (item.getItemId()) {
case MENUITEM_YELLOW:
ll.setBackgroundResource(R.color.bgColorYellow);
break;
case MENUITEM_ORANGE:
ll.setBackgroundResource(R.color.bgColorOrange);
break;
case MENUITEM_CYAN:
ll.setBackgroundResource(R.color.bgColorCyan);
break;
}
return super.onOptionsItemSelected(item);
}
public void showInfo(MenuItem item) {
int id = item.getItemId(); // 옵션 메뉴 아이템의 id 값 (정수)
String title = item.getTitle().toString(); // 옵션 메뉴 아이템의 title 값
int groupId = item.getGroupId(); // 옵션 메뉴 아이템의 그룹 id 값 (정수)
int order = item.getOrder(); // 메뉴 아이템의 순번
String msg = "id: " + id + " title: " + title + " groupId: " + groupId + " order: " + order;
Log.d("myapp", msg);
Toast.makeText(this, title + " 메뉴 클릭", Toast.LENGTH_SHORT).show();
}
} // end Activity
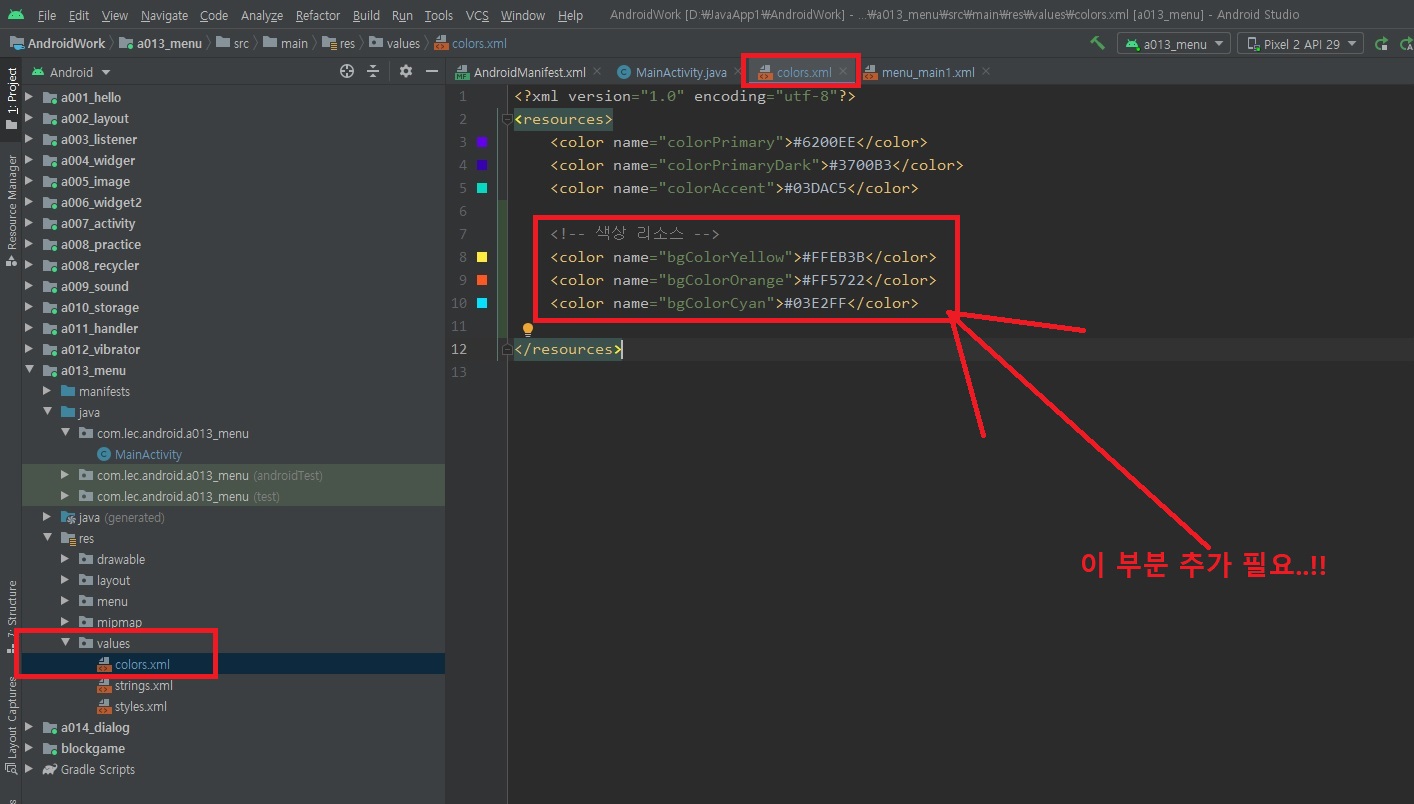
[추가] R.color.bgColorYellow, R.color.bgColorOrange, R.color.bgColorCyan와 같은
아래의 사진과 같은 코드를 작성하려면 색상 리소스 추가가 필요하다.
[색상 리소스 추가하기] res > values > colors.xml 의 파일에서 아래의 사진에 표시한 부분을 추가해야 한다...!!
2) Main2Activity 액티비티, activity_main2 레이아웃

<?xml version="1.0" encoding="utf-8"?>
<manifest xmlns:android="http://schemas.android.com/apk/res/android"
    package="com.lec.android.a013_menu">

    <application
        android:allowBackup="true"
        android:icon="@mipmap/ic_launcher"
        android:label="@string/app_name"
        android:roundIcon="@mipmap/ic_launcher_round"
        android:supportsRtl="true"
        android:theme="@style/AppTheme">
        <activity android:name=".Main2Activity">
            <intent-filter>
                <action android:name="android.intent.action.MAIN" />

                <category android:name="android.intent.category.LAUNCHER" />
            </intent-filter>
        </activity>

        <activity android:name=".MainActivity" />
    </application>

</manifest>
<?xml version="1.0" encoding="utf-8"?>
<LinearLayout xmlns:android="http://schemas.android.com/apk/res/android"
xmlns:app="http://schemas.android.com/apk/res-auto"
xmlns:tools="http://schemas.android.com/tools"
android:layout_width="match_parent"
android:layout_height="match_parent"
android:orientation="vertical"
tools:context=".Main2Activity">
<TextView
android:id="@+id/tvTitle"
android:layout_width="match_parent"
android:layout_height="wrap_content"
android:text="ContextMenu"
android:textAppearance="@style/TextAppearance.AppCompat.Display1" />
<TextView
android:id="@+id/tvCtxMenu"
android:layout_width="match_parent"
android:layout_height="59dp"
android:layout_margin="5dp"
android:background="#CDDC39"
android:text="→여기를 롱클릭 하시면 ContextMenu 등장"
android:textAppearance="@style/TextAppearance.AppCompat.Large" />
<ImageView
android:id="@+id/ivCtxView"
android:layout_width="match_parent"
android:layout_height="138dp"
app:srcCompat="@mipmap/ic_launcher" />
</LinearLayout>
** 아래의 사진처럼 사진 추가 후...!!
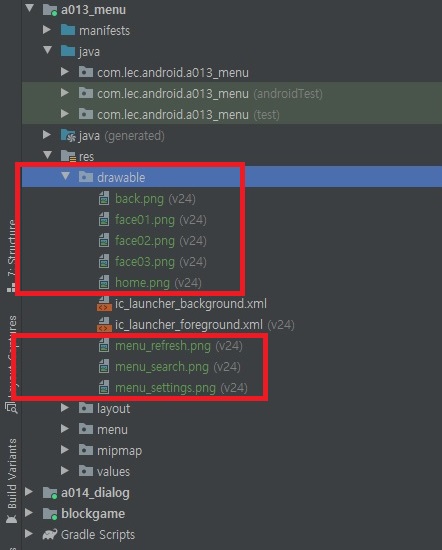
** Main2Activity 액티비티 작성하기
package com.lec.android.a013_menu;

import androidx.annotation.NonNull;
import androidx.appcompat.app.AppCompatActivity;

import android.graphics.Color;
import android.os.Bundle;
import android.util.Log;
import android.view.ContextMenu;
import android.view.MenuItem;
import android.view.View;
import android.widget.ImageView;
import android.widget.TextView;
import android.widget.Toast;

/* ContextMenu - 뷰 객체를 롱클릭했을 때 나오는 메뉴
   PC 에서 마우스 우클릭으로 부가정보들을 제공하는 방법을
   스마트폰에서는 롱클릭의 ContextMenu 로 대체하여 구현한다
*/

public class Main2Activity extends AppCompatActivity {

    TextView tvCtxMenu;
    ImageView ivCtxMenu;

    @Override
    protected void onCreate(Bundle savedInstanceState) {
        super.onCreate(savedInstanceState);
        setContentView(R.layout.activity_main2);

        tvCtxMenu = findViewById(R.id.tvCtxMenu);
        ivCtxMenu = findViewById(R.id.ivCtxView);

        registerForContextMenu(tvCtxMenu);  // 뷰 객체(위젯 등...) 에 contextMenu 를 등록함
        //unregisterForContextMenu(tvCtxMenu);    // 뷰 객체(위젯 등...) 에 등록된 contextMenu 제거

        // #2
        registerForContextMenu(ivCtxMenu);
    } // end onCreate()

    // onCreateContextMenu()
    // 컨텍스트 메뉴가 생성될 때, 호출되는 콜백 메서드
    @Override
    public void onCreateContextMenu(ContextMenu menu, View v, ContextMenu.ContextMenuInfo menuInfo) {
        super.onCreateContextMenu(menu, v, menuInfo);
        Log.d("myapp", "onCreateContextMenu()");

        // 각각의 뷰 (위젯) (View v) 마다 다르게 메뉴 작동하도록 설정 가능
        switch (v.getId()) {
            case R.id.tvCtxMenu:
                menu.setHeaderTitle("색상을 선택하세요");
                menu.add(0, 1, 100, "빨강");
                menu.add(0, 2, 100, "녹색");
                menu.add(0, 3, 100, "파랑");
                break;
            case R.id.ivCtxView:
                menu.setHeaderTitle("얼굴을 선택하세요");
                menu.add(1, 1, 100, "아이언맨");
                menu.add(1, 2, 100, "캡틴그분");
                menu.add(1, 3, 100, "헐크");
                break;
        }

    }


    // onContextItemSelected(MenuItem)
    // ContextMenu 의 메뉴아이템 항목을 선택(클릭) 했을 때 호출
    @Override
    public boolean onContextItemSelected(@NonNull MenuItem item) {
        Log.d("myapp", "onContextItemSelected()");
        showInfo(item);

        int id = item.getItemId();  // 메뉴아이템의 id값
        int groupId = item.getGroupId(); // 메뉴아이템의 그룹아이디 값

        switch(groupId){
            case 0:
                switch (id){
                    case 1 : // 빨강
                        tvCtxMenu.setTextColor(Color.RED);
                        return true;
                    case 2 : // 녹색
                        tvCtxMenu.setTextColor(Color.GREEN);
                        return true;
                    case 3 : // 파랑
                        tvCtxMenu.setTextColor(Color.BLUE);
                        return true;
                }
                break;
            case 1:
                switch (id) {
                    case 1 :
                        ivCtxMenu.setImageResource(R.drawable.face01);
                        return true;
                    case 2:
                        ivCtxMenu.setImageResource(R.drawable.face02);
                        return true;
                    case 3:
                        ivCtxMenu.setImageResource(R.drawable.face03);
                        return true;
                }
                break;
        }

        return super.onContextItemSelected(item);
    }

    public void showInfo(MenuItem item){
        int id = item.getItemId();   // 옵션메뉴 아이템의 id 값
        String title = item.getTitle().toString();   // 옵션 메뉴의 title
        int groupId = item.getGroupId();   // 옵션 메뉴의 그룹아이디
        int order = item.getOrder();

        String msg = "id:" + id + " title:" + title + " groupid:" + groupId + " order:" + order;
        Log.d("myapp", msg);
        Toast.makeText(getApplicationContext(), title + " 메뉴 클릭", Toast.LENGTH_SHORT).show();
    }

} // end Activity'웹_프론트_백엔드 > JAVA프레임윅기반_풀스택' 카테고리의 다른 글
| 2020.04.24 (0) | 2020.04.24 |
|---|---|
| 2020.04.23 (0) | 2020.04.23 |
| 2020.04.21 (0) | 2020.04.21 |
| 2020.04.20 (0) | 2020.04.20 |
| 2020.04.17 (0) | 2020.04.17 |